October 17, 2012

A Pumpkin Pake

Pumpkin Cuppake with a little bit of whipped cream on the side, sprinkled with a bit of cinnamon
      Well, technically, they are pumpkin cuppakes- cupcakes wrapped in little pieces of pie dough instead of the usual paper wrapper. Fair warning, this recipe makes for one heck of an awesome carb-filled biteful.
    For those of you who remember my first foray into baking a pake- it was a blueberry pie with a sour cream cake, aka a blueberry pake- I did it for the sake of Drop Dead Diva. They now have a recipe on their site for those wishing to make a pake, but all the ingredients are canned or come from a box (lame!) So, I set out to make another wonderful pake, this time with fall flavors in mind. My dad and mom came to visit last weekend, so I made these treats in my dad's honor since he loves pumpkin pie. And as much as I rag on the Lifetime recipe for not being "from scratch." I am not a total glutton for punishment, so I did use store bought pie dough and store bought canned pumpkin (if you want to make your own, feel free- I've done it in the past and it is delicious, if time consuming.)

October 6, 2012

Make A Card- Halloween Edition

Finished card- pumpkin patch
     Now, obviously, I am a bit early for Halloween, but when you send people things in the mail, you have to be ready earlier than the actual holiday. And when you make them yourself, it is even earlier, so I am actually on schedule this year to send them to people during the correct holiday (versus normal when I send Christmas cards as New Year's cards- whoops.)
     Cards still take me a long time to make, mostly because I am a perfectionist and I like to do as many of the pieces as I can by hand. However, I have shortened my hour per card standard a bit by using repetitive shapes and rifts off the same card style.

September 27, 2012

A Sour Attempt At Pickling

     Puns aside though, this was a colossal disaster: please in no way follow any of my instructions to make this or your hopes for pickles will turn into salty seas of sadness.
    My brother subscribes to get a farmer's basket every other month with various vegetables (I call it Hippy Harvest); a few weeks ago we got a few pickling cucumbers from the farmer's basket. Now, I love pickles. LOVE THEM. I used to be the kid who would buy a cup of frozen pickle juice for 50 cents while at the skating rink- Or, if I was feeling incredibly wasteful with my allowance, I would get an entire giant pickle. And while I can't quite stomach that much acid at a time any more, there is nothing I like better than sneaking a little crunchy pickle snack into my day.
    So, I thought, I should make my own pickles! What a grand adventure it will be- battling all the possibly dangerous bacteria floating around in home canned pickles (well, so say the critics). And of course, should I go with the classic kosher pickle recipe, using lacto-fermentation (mostly salt) or the modern stand-by (mostly vinegar.) Since I have had so many vinegar pickles, I decided to go with salted pickles. The theory is that as the brine increases in it's fermenting, the salty cucumbers will excrete salt in the form of a sour, tanginess. Or something more scientific than that. So the longer you leave the good bacteria to do it's thing, the more sour your pickles become. And they continue to ferment until they are eaten and "go bad."
     But for some reason, I didn't actually try to follow the recipe that the video pickle-guys used. Instead, I used a recipe from a random cookbook. And while I am sure the recipe was great, I apparently can't convert a recipe for one large crock into the three jars I ended up using. Instead of splitting the mixture between the three jars adn then adding water (as the directions for the crock recipe said to), I added all the salt mixture to one jar and then made a new batch. the amount of salt I used was a bit extreme (1/3 cup for the big jar and another 1/3 cup split between the smaller jars); this is expesially ridiculous when you look at the measurements from the first video (1 tablespoon per jar.) Yikes! As soon as I tried them, I winced in salt-shock and I was still tasting salt in my mouth hours after I tested them. I should have just put the slices over my eyes and called it quits for the day.

     I found a couple of really good videos explaining the process, which I will post below:

How to Make Dill Pickles with Lacto-Fermentation 

How to Make Fermented Dill Pickles 

September 11, 2012

Plant Buckets

Finished product- I actually have 7 hanging on the balcony railing, but it was hard to get a shot wide enough to show it
     Ok, for those of you that read my blog (or know me), you know what an avid gardener I am. One of the sadder parts about leaving home was not having access to garden spaces at my parents house. And with how stuffed my car was, I couldn't even fit my miniature pepper plant or my - admittedly large- aloe plant on my trip to Houston.
     Living in a second floor apartment now, I only have access to two tiny balconies (ok, technically one since the other is my brother's.) But I can't live without plants either. So I decided to maximize space by hanging the plants instead of clustering them on the floor of the balcony. This isn't necessarily a novel concept, but I didn't want to spend a bunch of money on a fancy pantsy "do-it-yourself kit" when I know I could do it myself.
      I went to Tuesday Morning and happened to find these little buckets for $1.50 each. They are a great size to start off with for what I needed at the time, but I will probably have to expand as the plants grow. Cooking is really important to my brother and herbs are great plants to start out with as I get used to growing in this new climate (so tropical- I want a citrus tree!)

August 29, 2012

Curtain Drama, Part 2

Hello again,

Measurements (1.5 X length; add 6" to height)
     I just finished the curtains for my room. This project was full of decisions, starting with whether or not I wanted to buy commercially made curtains or make my own. The window in my new bedroom is rather large (74"x 60"), which means usually means expensive. An added challenge was the amount of light being let through at all times- my room was as almost as bright during the day as at night- which was the whole reason I thought of doing curtains. I needed to make sure I got black out material to solve this problem.

    After looking at multiple stores to curtains, I decided to make my own. All the ones I saw were either too childish (bright colors, sheer, glitter) or too grown up (boring colors, muted tones). I really needed something in between, so onward and upward to the fabric store. I went to Jo-Ann's, and though I will be the first to admit they aren't my favorite craft store, they did have a home decor section with blackout curtain material. The Hobby Lobby across the street did not (...I miss you hancock fabric).
Blackout fabric: middle seam   Make sure so sew both sides of the seam (1/8") so that one side doesn't flap open


August 27, 2012

Curtain Drama, Part 1

     I desperately need curtains in my bedroom. After being attacked by something (eww, creepy bugs that bit my face) on our family reunion in upstate NY, I threw out my face sleeping mask. When I moved to Houston, I realized how much light came into my room at night, but couldn't bring myself to buy another mask just in case it happened again (eww, creepy bugs that bit my face). Curtains were the answer!
     The story of how I finally got my curtains will be in the next part post. This is the story of how I made my curtain rod. After wandering around Home Depot for almost 2 hours, I was emotionally exhausted. Who knew putting up curtains and a shelf in my closet would be so draining? All the curtain rods for a window my size were ridiculously expensive ($27-$32) and I would still have to buy curtains to put on these rods. The tension rods, while cheaper, wouldn't be able to hold up the amount/weight of fabric that my curtains were sure to have being blackout style. 
Curtain Rod assembly, once complete: Closet rod + U conduit clamp + screws + end caps + spraypaint

August 24, 2012

Measure Twice, Cut Once

    Ah yes, the age old adage: measure twice, cut once. Meaning that if you take proper time to figure out what you are going to do with a project before jumping in willy nilly, you (hopefully) won't have to do it over again.  But I have never been one to listen to tried and true wisdom and In dislike tedious calculations (I'd rather eyeball it- which made my decision not to pursue architecture fairly obvious.) So, instead I ended up having to do much more trouble shooting with these three projects than I would have if I had just measured and thought about what I was doing before I started sewing.
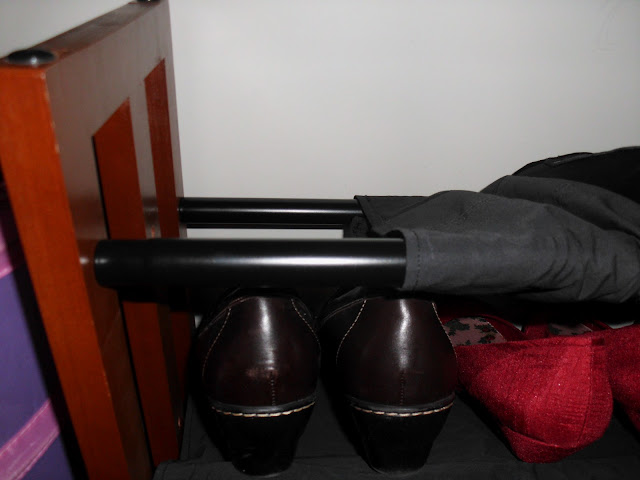
Finished product: 2 metal slats that make up the tiers, covered in a fabric sleeve to keep shoes from falling through

    I have lots of fun projects to tackle now that I am living in Houston, Texas. So, first things first: make sense of my shoes. My brother gave me a shoe rack with 3 tiers a while ago, however, whenever I used it, my shoes would always fall through. Basically, it is missing the middle metal rung on each tier (no idea what happened to them...) When I moved, it got taken apart and it was the perfect opportunity for me to fix the problem. My solution? Making sleeves out of fabric (I was thinking of wrapping paper at first, but I didn't go for that as I had more fabric and no wrapping paper). It probably would have worked fairly well with the paper, but fabric will stand the test of time for sure.
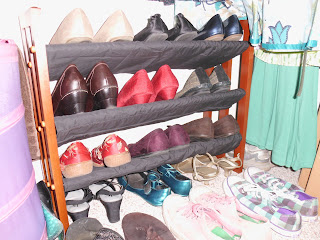
It looks classier with fabric sleeves
     This, of course, should have been an easy problem. You have a length/width of fabric and you measure around the bars. I could have wrapped a piece of string around this and measured. Easy right? But I didn't do it that way. Instead, I tried to use a length of fabric I had left over from a previous project, thinking that sewing the ends together I would have plenty of room. Not so much. However, I carried on, squeezing it over the rungs/tiers and making the next two sleeves. Unfortunately, when I went to screw in the second set of screws, I had a bit of a problem on my hands. The material was too tight on one end (yes, on all three of the pieces.)

     So I had to take it apart and sew on a scrap length of fabric to make it fit. Not my most stellar craft moment, for sure.  After that, they fit. Thank goodness.